 |
| The first three courses of dome brick can be set without forms |
A dome's strength relies on each brick exerting force upon the bricks below it in an even distribution.
Straight walls with a dome on top place undo pressure (outwards) on the top of the vertical wall.
Brick for the dome can either be cut into wedges, each course needs a different angle, or laid as square bricks with mortar filling the joints.
 |
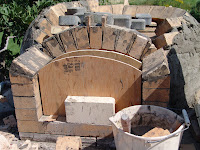
| Arched opening at the mouth and throat need a form |
 |
| After four or five courses a form is needed to hold the dome bricks during mortaring |
 | |
| temporary wood wedges tilt brick on each course and are removed later |
 |
| The brick at the top of the dome need to be custom cut. The keystone holds the entire dome together. |
I built a angle-iron reinforced mouth for my first small portable oven. The chimney tile rests on this solid frame and it has withstood three years of bumping down the worst roads in New England.
The springs on the trailer and the integrated strength of the brick dome have proved to be plenty strong.
For designs that are stationary, more elaborate arched details can be added without the hazard of movement.
Note that this oven was built on a pallet so that it could be lifted onto and off of a trailer.
 A steel frame allowed me to enclose the dome and add the maximum amount of insulation within the box. The exterior was covered in backerboard and stuccoed with brick detailing.


interesting blog. It would be great if you can provide more details about it. Thanks you
ReplyDeletePortable Oven